2.01 dh_ArrangeViews:
Collapsed view

dh_ArrangeViews stores "snapshots" of Reaper's arrange view window
(referred to as "views" for this script). Each view will store
the start time and end time of the arrange view window,
as well as the status of any selected media items,
and the position of the edit cursor.
The display has two menuboxes, each with a list of all
the current project's saved views.
Click on a menubox to open a dropdown menu with available views
and select one. Click on the “Go”
button next to the menubox to restore that view.
Set the menuboxes to different views to allow for quick switching
between them. When selecting a view from either menubox, or
clicking one of the "Go" buttons, the textbox in the bottom row
gets the name of the selected view. Beside indicating the last
selection, it also serves as a convenience for renaming of views.
Changing project tabs updates the script with the current project data.
In Preferences you can select which options to restore when clicking "Go" button.
See "Options panel" later on page.
The “More” button (+ sign)
expands the window to show more features. I designed it this way
so as to be able to keep the window as small as possible
so as to not clutter reaper’s interface. Click to expand,
click again to collapse.
Expanded view

The expanded window reveals
a bottom row that has additional features.
The “Add” button will add
the current state of Reaper's arrange view window
(start time, end time, selected items, and cursor position)
as a "view" with the name displayed in the textbox window.
Edit the name in the textbox as you see fit. If you use the
name of an existing view then that view will be updated with
the current view state.You will be prompted if trying to
overwrite an existing view.
The “Del” button will delete
the arrange view snapshot with the name in the textbox.
You will be prompted to confirm.
Also displayed is a menubox that has a list of the names
of all of the current project’s regions. Select a region
from the menubox dropdown menu. With a region selected click
on the adjacent “Go” button
to navigate to that region. Right-clicking on the
“Go” button refreshes
the regions list in case any region markers were added,
deleted, or modified after the script was opened.
Preferences:
Right-click, or Alt+click on the “More” button to open the Preferences window.
Preferences window
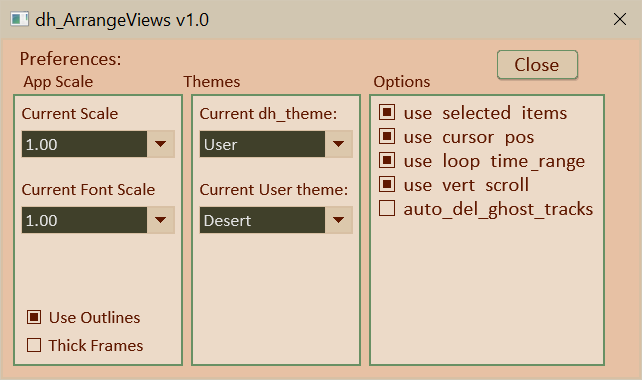
The App Scale panel:
Current Scale:
Making a selection from this selection box scales the script
window, including all elements and fonts.
Current Font Scale:
Making a selection from this selection box scales all of the
script's fonts relative to 'designed' size. This is included
in case a system font's size is different than that of the
system the script was designed on.
(The font size of native menuboxes and
message boxes will not change as they are determined by the system.)
Use Outlines:
Use this checkbox to specify the type of outlines to use.
The text elements, knob and slider display boxes, and slider
track normally use a highlight/lowlight frame derived from the
background color. Alternately, the frames can use a single color
outline specified the theme's 'elm_frame' color.
Check the box to use the latter. (Themes have
a false color 'metadata' which is used to specify that the GUI
is to always use the single color option.)
Thick Frames:
Use this checkbox is used to specify if thinner or
thicker outlines should be displayed. As of 04-16-2026 they are
1 pixel or 2 pixel width.
The Themes panel:
Current dh_theme:
Use this menubox to select a dh_Toolkit theme for the GUI.
If "User" theme is selected it displays the
"Current User theme"
menubox (if there are any user themes). Use that menubox
to select a user theme.
The Options panel:
Displays the view options. The first four options are always
saved when adding a view. If one of these options is checked
it will be restored when applying a view. (By unchecking
the boxes you can disable if those states are updated
when applying a view.)
“Close” button:
Click this to return to the main script.