2.04 dh_HearingTest:
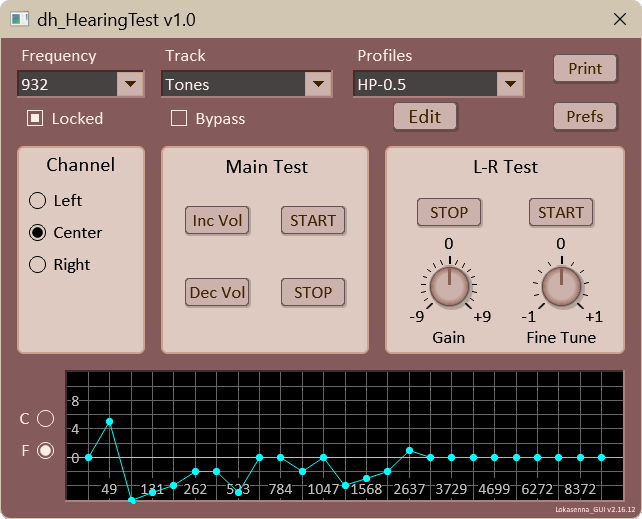
dh_HearingTest (showing Mocha theme)
Introduction:
Say, an individual has a significant hearing loss at 3000Hz.
While mixing a song that person may tend to boost the gain at
that frequency so it sounds good to him or her. But for a
person with "normal" hearing that boost may not be so pleasing.
Another factor is, even a person with normal hearing perceives a 1 Khz tone
to be louder than a 200hz tone with the same sound pressure.
Objective:
To produce a dataset of an individual's perceived loudness
to a set of tones, using a Fletcher-Munson curve of equal loudness
(to what is considered normal hearing) as a reference.
The data can then be used to set up an equalizer to compensate
your mix for any hearing loss, so that you may hear it more as
someone with normal hearing while not actually boosting frequencies
where they shouldn't be boosted.
Note: The equalizer should be the last fx on your master track.
Notes:
The Fletcher-Munson curve of 60 phon is defined as
60db sound pressure level (at your ears) at 1Khz.
60db is considered the level of normal conversation.
If calibrating to 60db SPL then you use the 60 phon curve
for the subsequent test. The starting loudness of the other
frequencies will be adjusted using the curves.
I chose 1047Hz (note C6) as the reference frequency, as it is
close to the 1Khz frequency from which the Fletcher-Munson
equal loudness curves were derived.
I've read somewhere that headphones are better than speakers
for discriminating loudness differences at lower frequencies,
and poorer at high frequencies.
Perceived loudness difference is greater at soft listening
levels than at loud levels.
An explanation of equal loudness can be found at:
Set up:
Create a new project. Name it "Hearing Test", or whatever you wish.
Insert a new track.
Insert a JS tone generator on that track.
Disable the tone generator so it isn't outputting a tone.
Leave tone generator wet mix gain at default -12db.
Set track gain to -18db.
IMPORTANT! The tone generator gain settings and the track gain must not be changed throughout testing, or it will invalidate the test results. Tests may be set up with the wet mix gain and/or the track gain at a different level than the default. Do this by making the adjustments in the "Calibration" section, accessed by clicking the "Edit" button. That way the settings will be saved in the "profile". I originally added this section for experimentation, but decided to keep it in the event anyone finds it necessary.
Insert a JS tone generator on that track.
Disable the tone generator so it isn't outputting a tone.
Leave tone generator wet mix gain at default -12db.
Set track gain to -18db.
IMPORTANT! The tone generator gain settings and the track gain must not be changed throughout testing, or it will invalidate the test results. Tests may be set up with the wet mix gain and/or the track gain at a different level than the default. Do this by making the adjustments in the "Calibration" section, accessed by clicking the "Edit" button. That way the settings will be saved in the "profile". I originally added this section for experimentation, but decided to keep it in the event anyone finds it necessary.
The DAW settings level should now be -42db below max. peak.
This should leave plenty of headroom for running the tests.
These settings represent the level sent to your output device:
audio interface, speakers, headphones, etc.; not the sound
pressure at your ears.
The sound pressure level in decibels that you hear is
determined not only by the above DAW settings, but by any
hardware settings between your DAW, up to and including
your headphones/speakers. You will need to set your headphones /
speakers to 60db sound pressure level at listening position.
Do this by adjusting an audio interface or your speaker output
directly. If those options are not available you will need to
adjust the tone generator gain to achieve the desired levels,
as noted above.
At higher sound pressure levels it takes less gain to perceive
equal loudness. My preliminary testing bears this out.
Calibrate:
Set the tone generator to use note "C" and octave +1.
This is our reference frequency of 1047Hz. If desiring to
change the tone generator wet mix gain do so in the
"Profiles" editon by clicking the "Edit" button. Enable the
tone generator, then set the gain.
Play the tone.
Calibrate using an SPL
(sound pressure loudness) meter:
Adjust the speaker/headphone volume (or the tone generator
gain) until 60db sound pressure level is achieved at your ears.
If you don't have an SPL meter there are some
phone apps available. I cannot attest to their efficacy.
Subjective calibration:
The Fletcher-Munson curves all have basically the same shape,
except for their scale. So, if you're not exactly at the correct
phon level, the perceived gain differences will be in the
correct direction, and should be in an acceptable range.
Assuming normal conversation is 60db, and assuming that your
mid-range hearing is okay (here comes the very subjective part):
Adjust the speaker volume until you think it is at that of
normal conversation.
Once you have your test calibrated this becomes the level
for which the entire test is based. This level must not be
changed or it invalidates all other test measurements.
Note the settings. I run my output through an audio interface,
then through a Big Knob to the speakers. If I want to
repeat or continue the test later, it will need those
settings. Perhaps save as a profile:
[ speaker level / headphones level; etc. ]
Proceed to the test now that 'calibration' is done.
Main Test:
Select the track that has the tone generator from the Track select box.
Select a frequency (other than the 1047Hz reference) to test.
In the Channel radio box select which channel is to be used for
the test: left, center, or right.
Make sure the Locked checkbox is not checked. If checked that
frequency is considered locked and a test cannot be performed
on it.
The Bypass checkbox does not affect any testing. If it is
checked then any resulting test data, although it will be
saved, will not be included in the resulting dataset.
Press the Start button to start the test.
The tone generator will produce bursts of tones alternating
between the selected frequency and the test frequency.
Use the "Inc Vol" or "Dec Vol" buttons to adjust the test
frequency's loudness until it appears equal to the
reference tone.
When satified press the Stop button to end that frequency test.
The test results will be saved internally.
Repeat for each desired frequency and/or channel.
LR Test:
I discovered that I also have hearing differences between my
left ear and my right ear; not just with perceived volume, but
with perceived pitch. Although this is mostly prevalent at
very low frequencies, I still found it unsettling.
Nevertheless, I developed a simple test to measure the differences.
Prepare the app as for the Main Test. The channel setting
doesn't matter. Press the Start button to start the test.
The tone generator will produce bursts of the test frequency
tone alternating between the left channel at the predetermined
volume and the right channel.
Use the "Gain" knob to adjust the volume of the right channel
until it appears the same as the left.
Use the "Cents" knob to adjust the pitch of the right channel
until it appears the same as the left.
The gain adjustment is limited to +-9db, and the cents adjustment
is limited to +-100 cents (a full semitone).
Press the Stop button to end the test.
The test results will be saved internally.
Profiles:
A set up can be saved as a profile. This is useful if you use
different configurations for your tests. You may have one
profile for using a particular set of headphones, and another
for using a pair of monitors. Click the "Edit" button below
the "Profiles" select box to open the profiles editor. There
you can add, rename, or delete profiles. Profiles are saved in
reaper-extstate.ini file.
Select a saved profile from the "Profiles" select box to load it.
dh_HearingTest Profiles (showing Mocha theme)
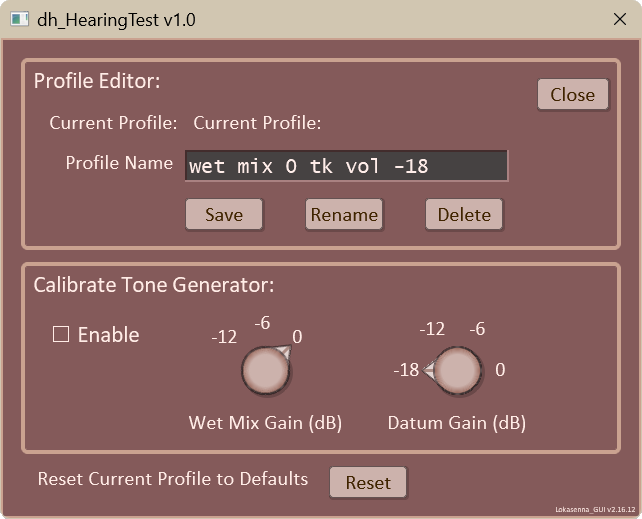
The 'Reset' button will set the test data of current profile
with the default (pre-test) data. You will be prompted to confirm.
Using the Test data:
Click the "Print" button to write the data of the currently
selected profile to the console window. You can use this data
to set up an equalizer to compensate for any hearing deficiencies
you may have. If the data shows that you have a hearing
deficiency (as compared to "normal" hearing) then you can
insert a band at that frequency, boosting its gain to compensate.
You would probably want to adjust it's Q for a smooth transition.
Use the equalizer as the last fx on your master track.
Enable the equalizer to hear your music closer to how someone
with normal hearing hears your music. Disable the equalizer to remove
your adjusted bias from the mix. Personally, I will probable
use an equalizer for each channel as I have significant
differences in my hearing perception between my left and right ear.
Graph:
The graph plots a point for each frequency of the currently
selected channel of the currently selected profile. The graph
has two modes: "C" and "F". "C" displays the Fletcher-Munson
curve overlaid with the profile's data points and their
deviation from it. "F" is a flat graph displaying each frequency's
gain deviation from "normal".
Prefs:
Click the "Prefs" button to open the Preferences window. Here
you can change the script window scale and / or theme.
Caveat:
dh_HearingTest is not to be a substitute for a
professional hearing test. It is only an approximation using
the Fletcher-Munson curves as a reference. Perceived
loudness can be skewed by differences in sound hardware amongst
other factors.
CAUTION:
Always use caution when adjusting volume levels
to protect your hearing, especially when using headphones.
Start with headphone / speaker volume to minimum output then
adjust up as necessary.